Attrition: The Instruction Booklet
There was something wonderful about the little instruction booklet that came inside a game box. You could read it on the ride home, meet the characters before meeting them on screen, and study a diagram of buttons you were about to press entirely too hard.
Attrition has accumulated enough new things that it deserves one of those booklets. We’ve been building out the campaign story, giving the commanders faces and voices, putting little armies on the table, and making the Field Manual into something you can actually get lost in. We’ve also spent a fair amount of time making sure the game accounts for what happened correctly. Less glamorous. Fairly essential in a game about counting what you have left.
So this update is Attrition’s game manual. Imagine a small stapled booklet, a slightly creased cover, and a cartridge waiting beside the television.
FIELD REVISION · SEPTEMBER 8, 2026: Rule 4 now uses Challenge consistently for the mechanic and reinforcement for the card committed during it. The achievement count has also been updated after probability calibration. The original publication and the revision are documented in the Developing Attrition series.
ILLUSTRATED FIELD REVISION · SEPTEMBER 10, 2026: The booklet now includes the opening sequence photographed on an actual phone, annotated table and menu plates, first-launch analytics guidance, and navigation back to this contents page. Several plates preserve an earlier field issue of the interface. This is both historically accurate and traditional for instruction manuals.
OFFICIAL FIELD ISSUE · SEPTEMBER 2026
ATTRITION
Instruction Booklet
52 cards. Two armies. Every casualty counts.
Please retain for future campaigns.
Command accepts no responsibility for misplaced confidence in an Ace.
Play Attrition in your browser
Contents
- Before you take command
- Your first turn
- The Field Manual
- Campaign orders
- Know your opposition
- Between engagements
- Notes from the quartermaster
Before you take command
Attrition began as a physical card game, invented years ago around an ordinary deck. The digital version still follows that deck: fifty-two cards, split into two armies of twenty-six. You normally command the red cards; your opponent commands the black cards. Each army is shuffled independently.
Your objective is to outlast the opposing army. Surviving cards return to their owner’s deck. Defeated cards go to the Boneyard, out of action for the rest of that War. You never recruit the opponent’s casualties into your own deck.
That gives every decision its weight. Sending help might save a valuable card. It might also turn one casualty into two.
The campaign takes place around the disputed events at Mont-Rouge, where French and Swiss traditions, two Witness Wheels, and some very confident people have produced a situation requiring far too many military orders. The commanders are cheesemakers, advisers, merchants, and one particularly concerning reader of rinds.
Yes, there is a cheese war. We have committed to the premise.
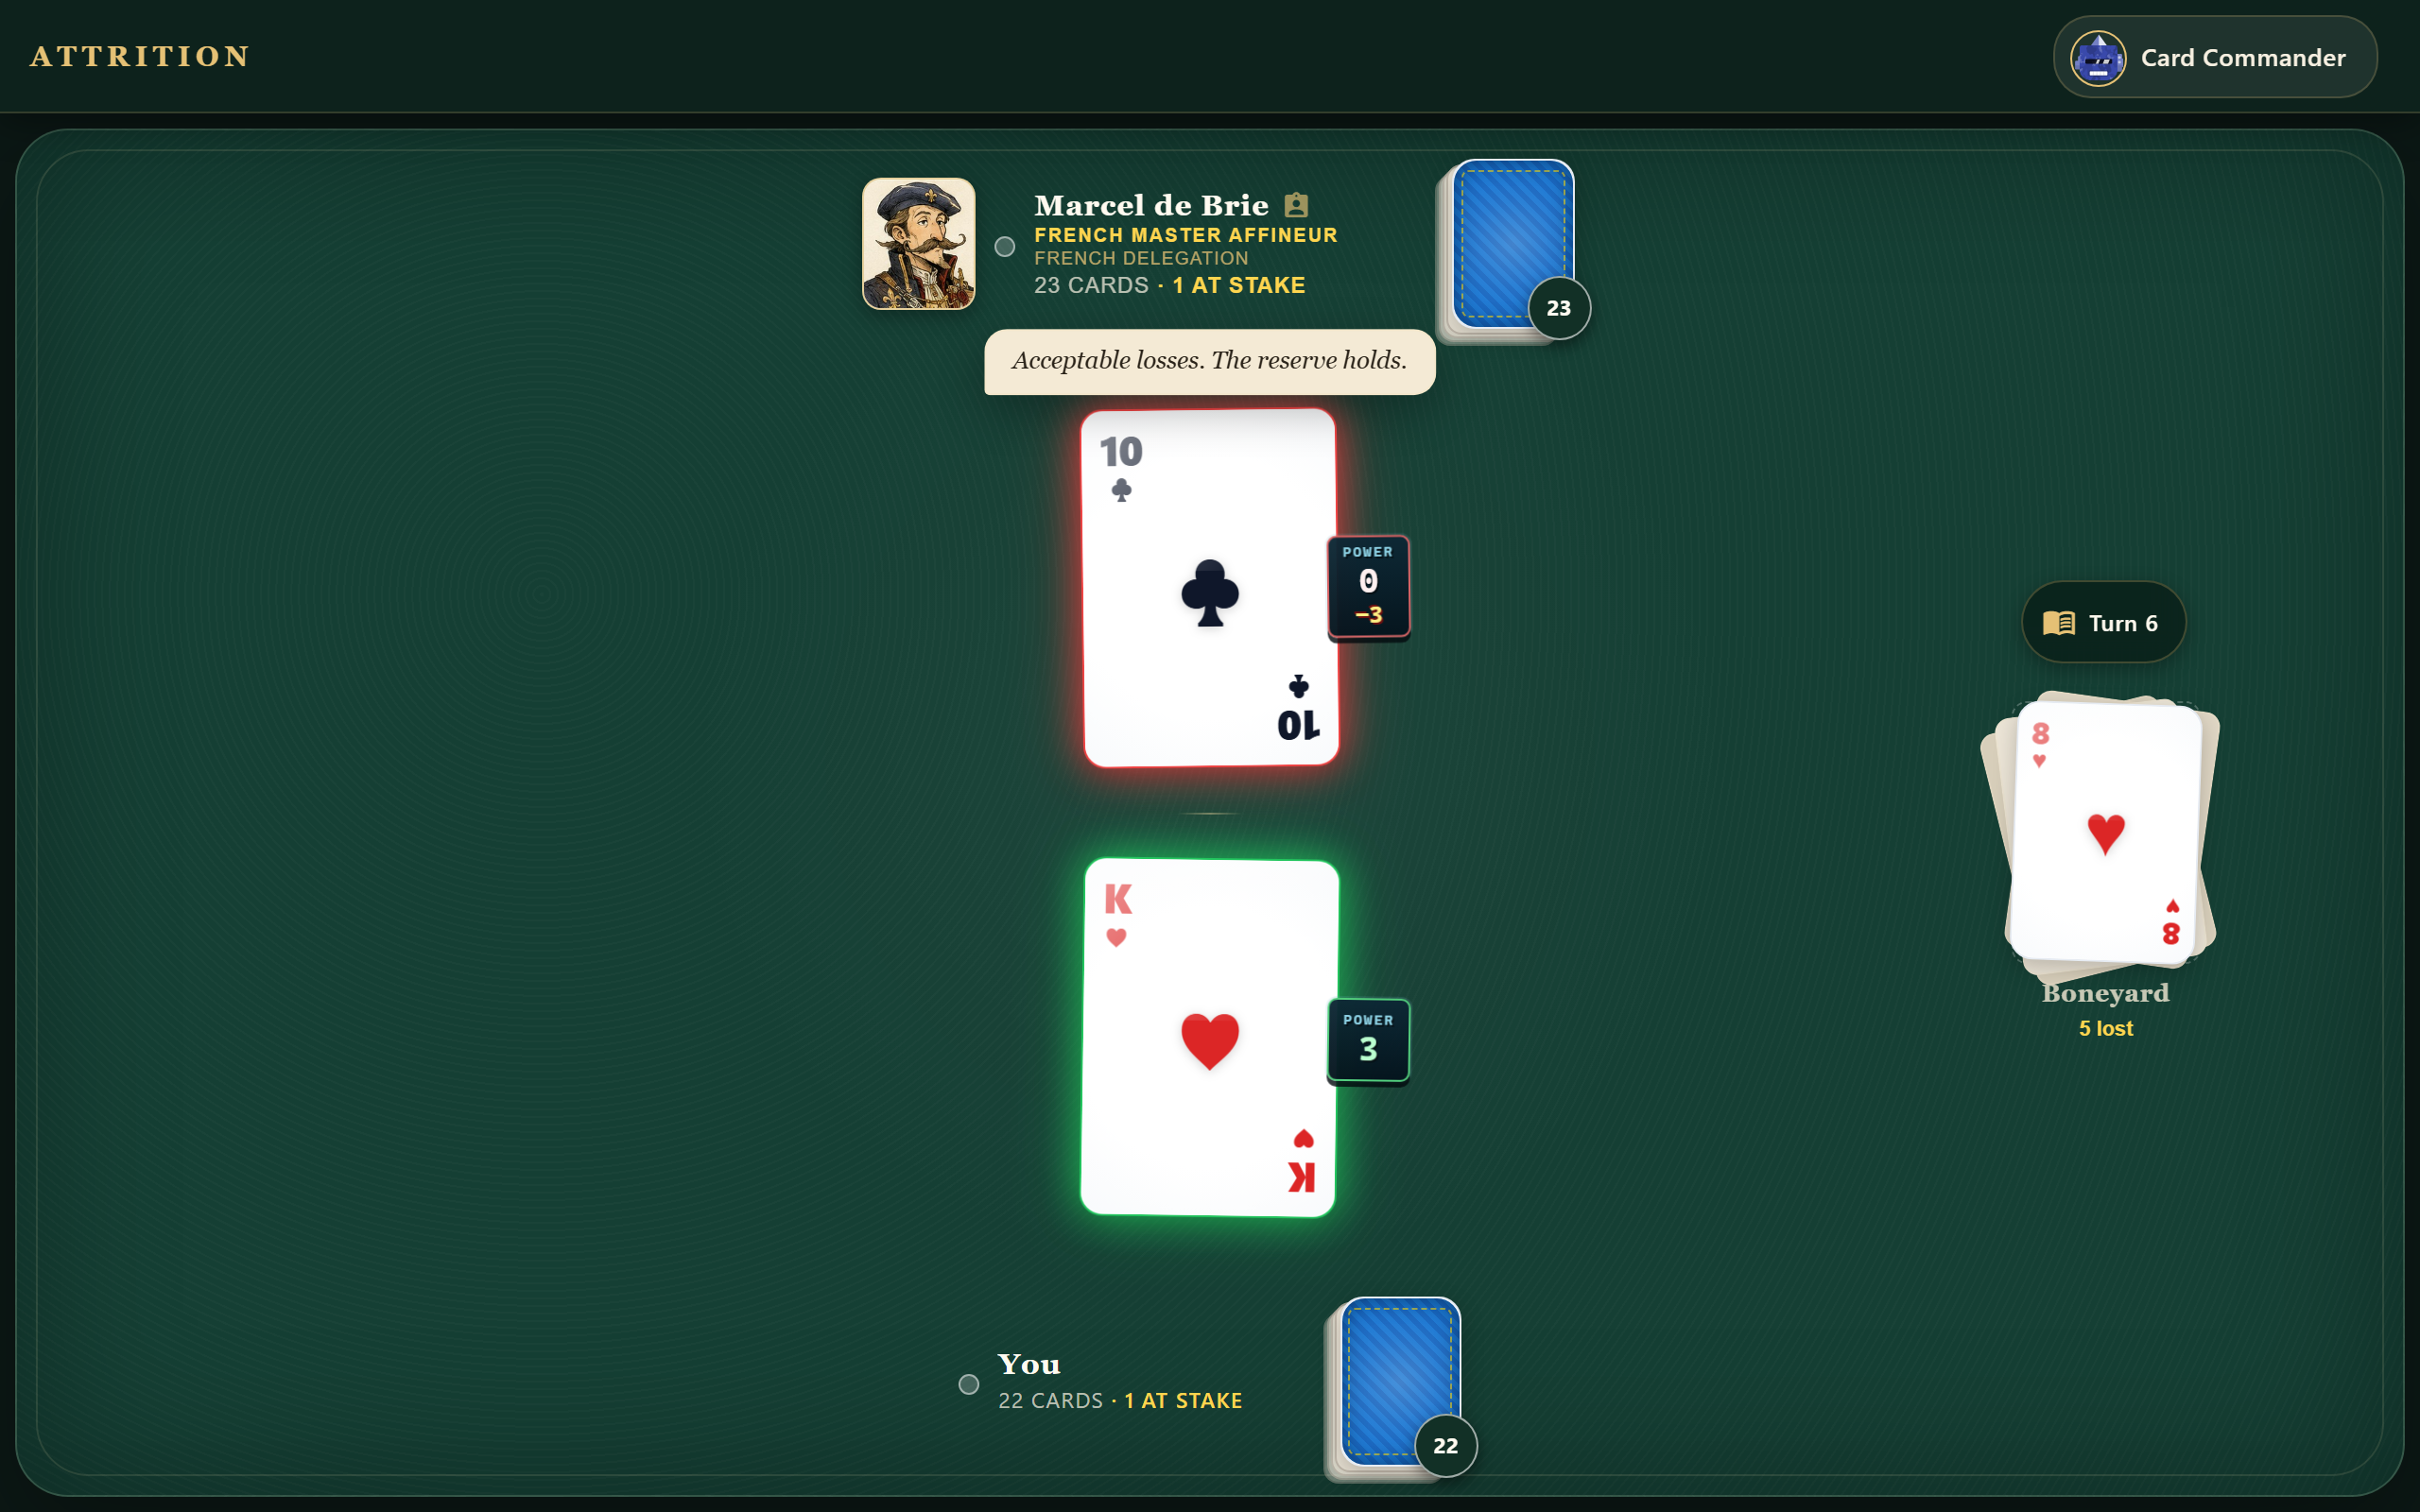
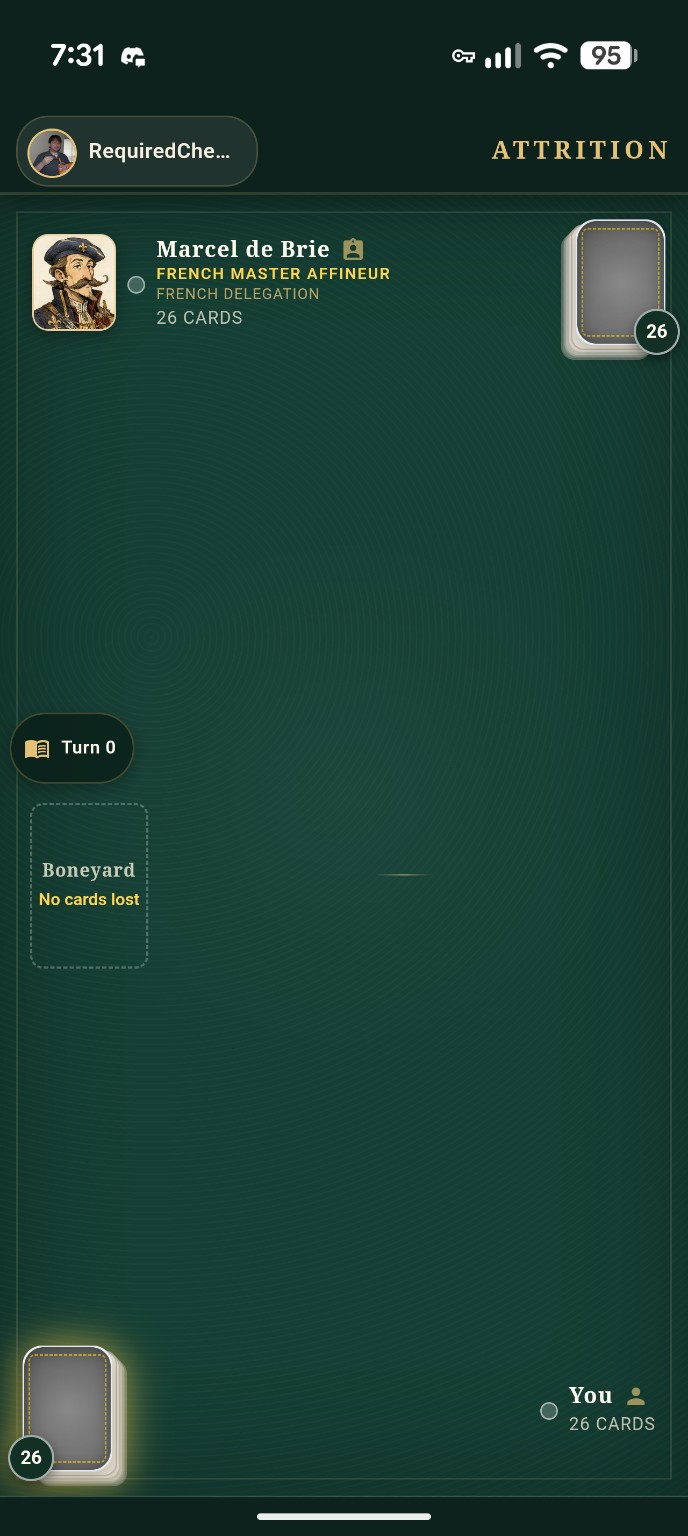
The table: your command below, your opponent above, the contested cards in the center, and the Field Manual and Boneyard beside the action.
Your first turn
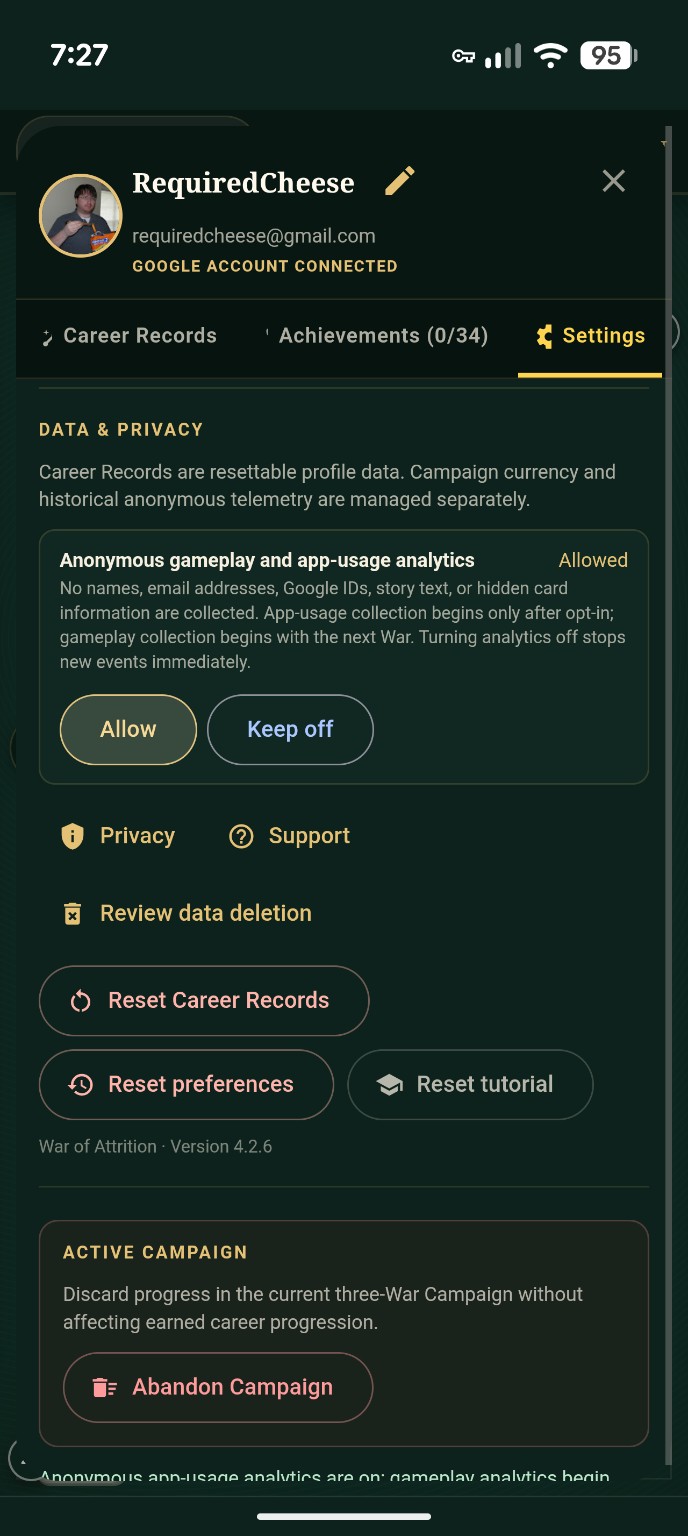
On first launch, Attrition asks whether you want to share optional gameplay and app-usage analytics. Choose Share anonymous data or No thanks; either choice lets you play, the game remembers it, and you can change it later under Settings → Data & Privacy. Names, email addresses, Google identities, story text, and hidden cards are excluded from the gameplay records.
The opening orientation then introduces the objective, the enemy command zone, your deck, the Boneyard, and the Field Manual. Follow the cards in order; Skip Tour remains available if you already know the table.

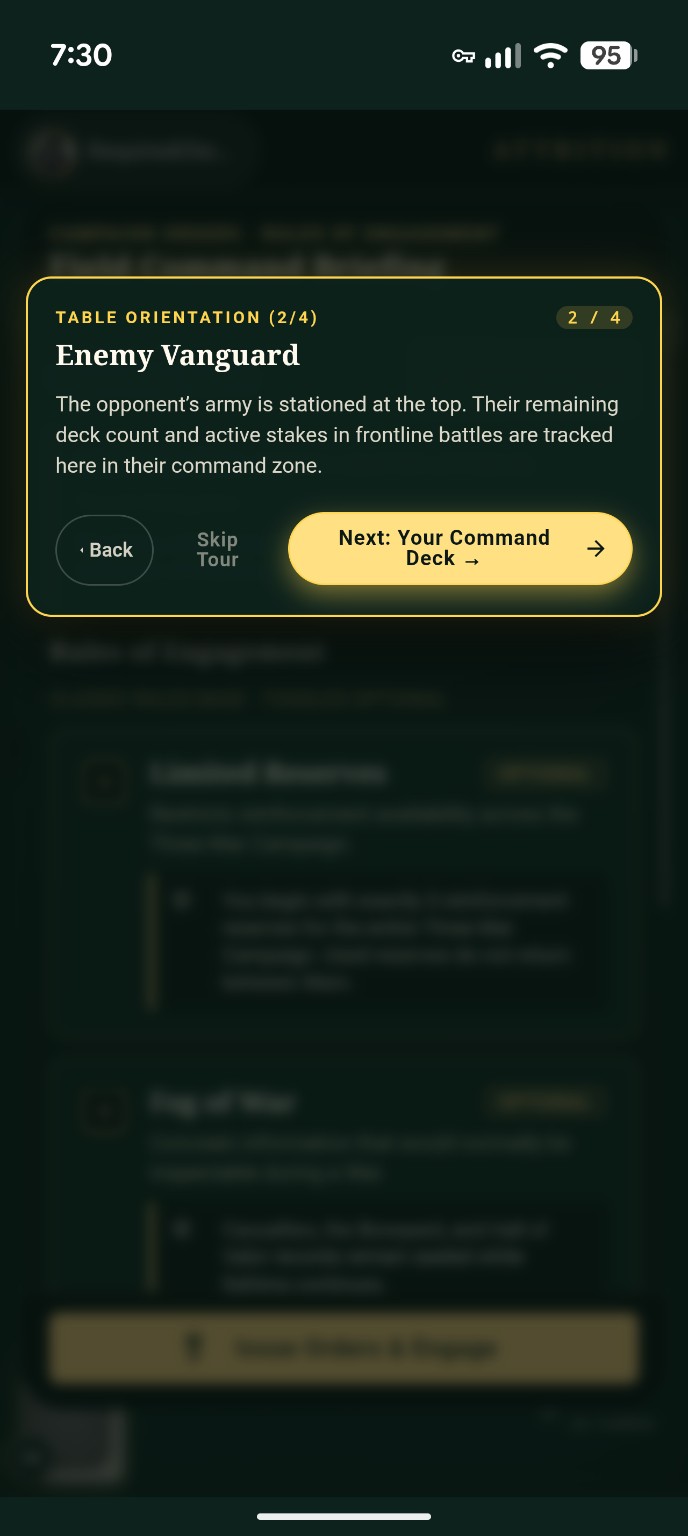
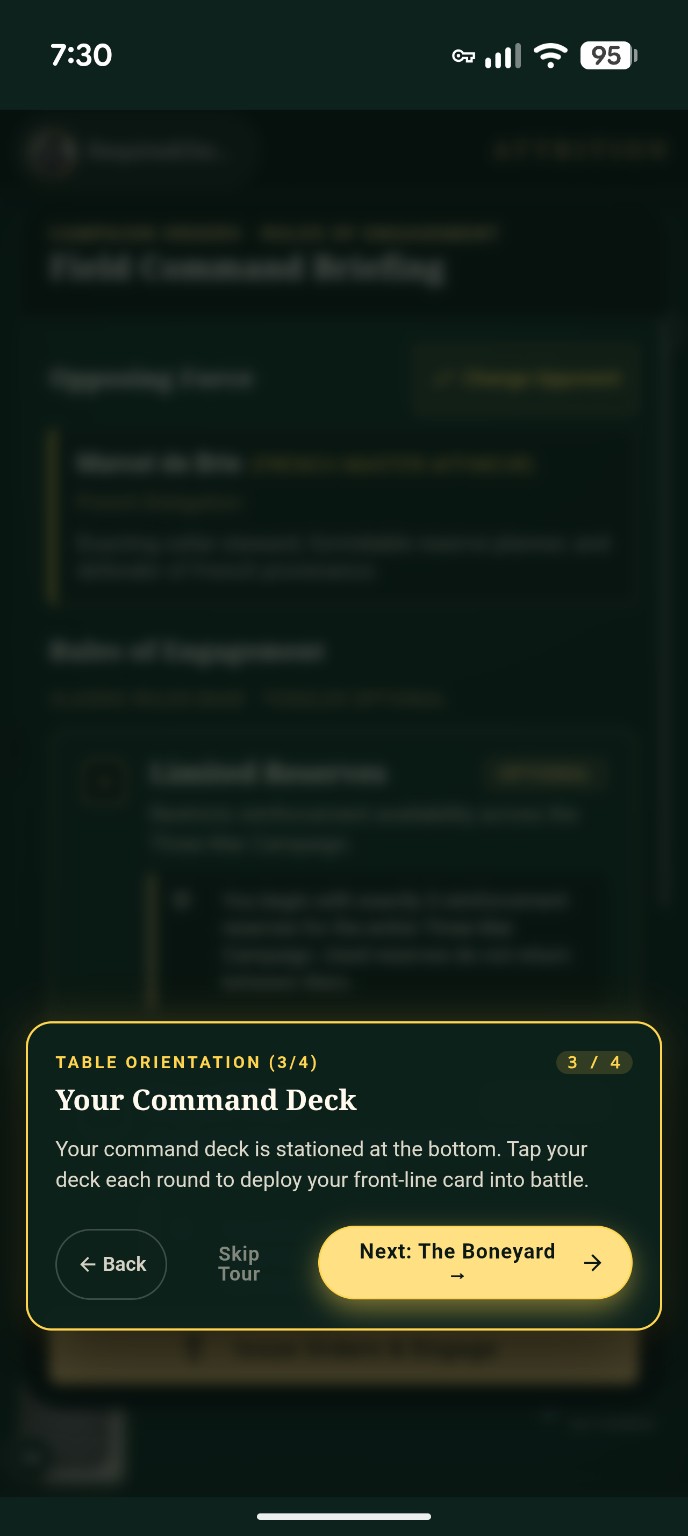
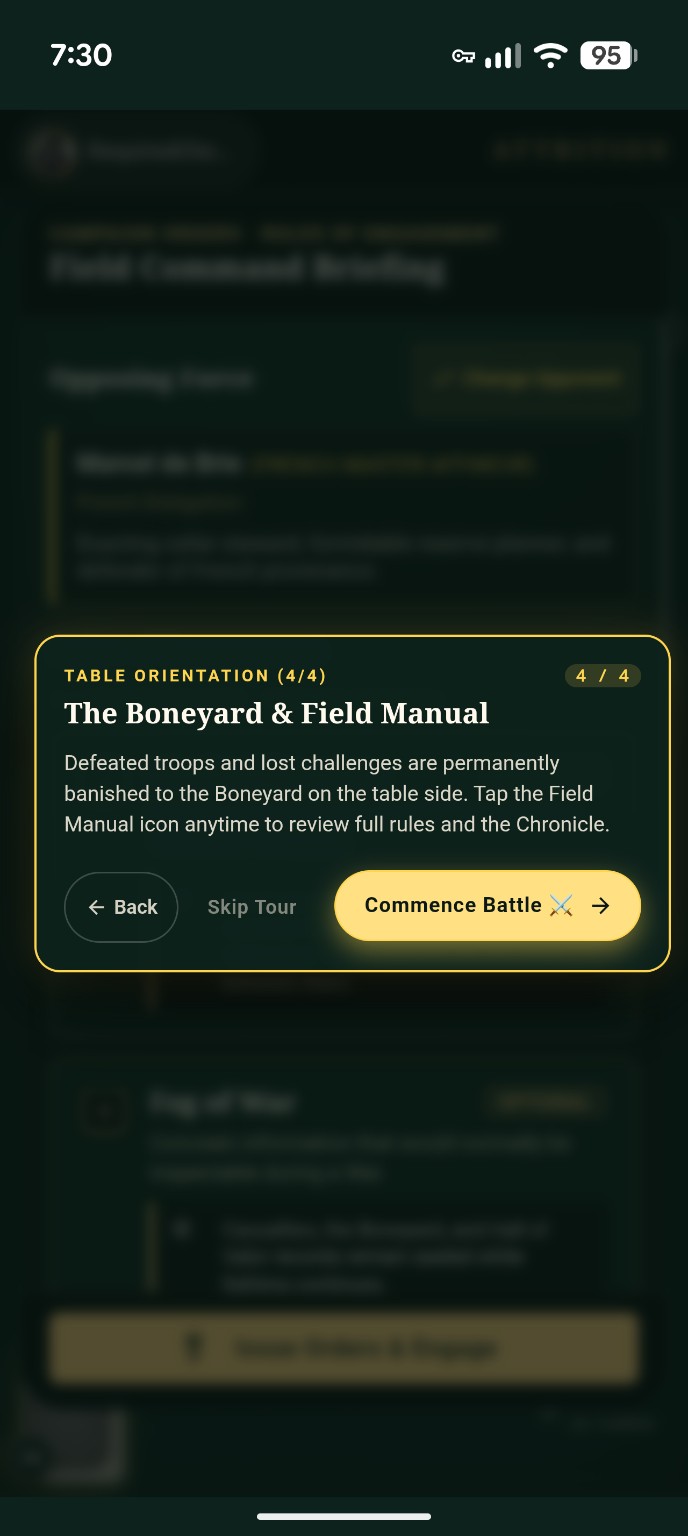
The photographed sequence is the original four-card briefing. The current issue adds a fifth Ready for Command card and requires you to open the highlighted Field Manual before the tour concludes. Command has retained the superseded pagination as an authentic instruction-booklet feature.
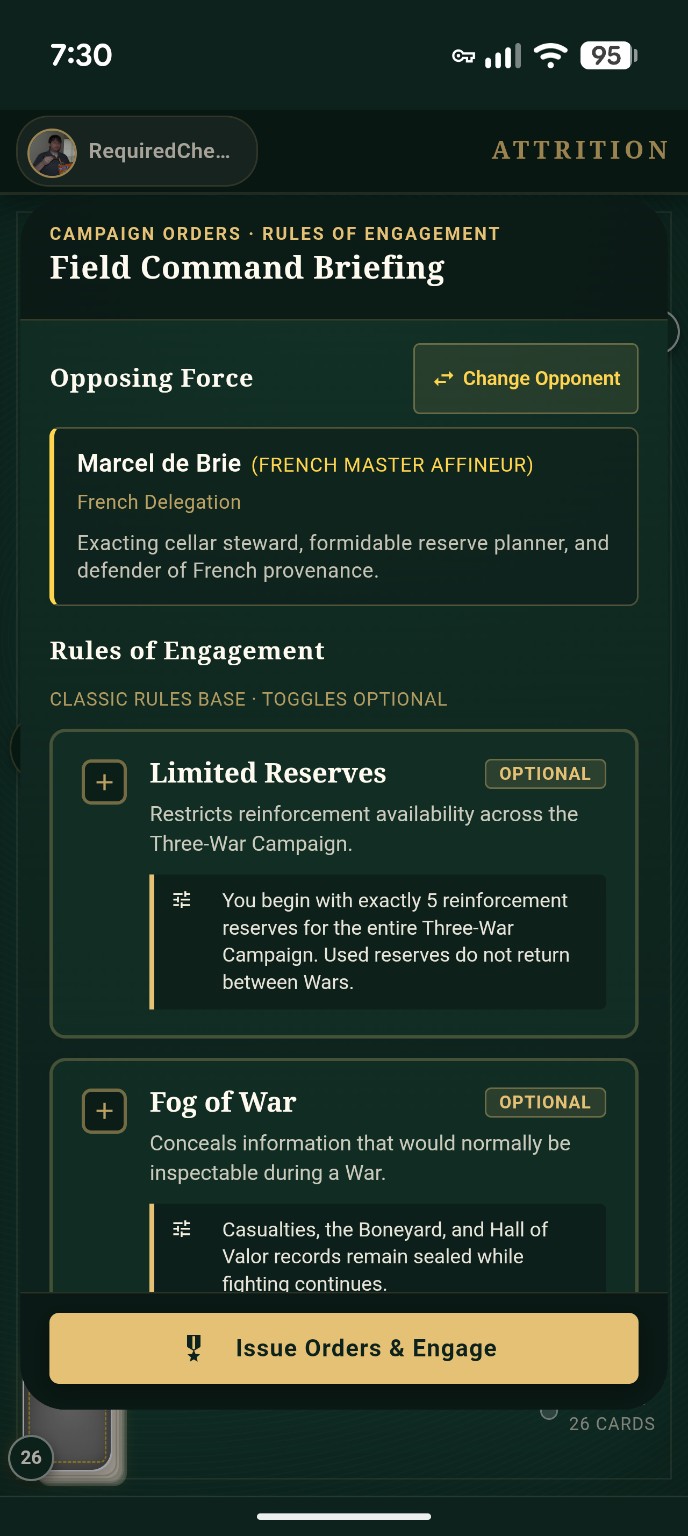
Read the Field Command Briefing, then select Issue Orders & Engage when your orders are ready.
| When you want to… | Your order |
|---|---|
| Begin the next clash | Click or tap your deck when prompted. Both sides draw. |
| Try to rescue a defeated card | Choose Challenge when offered. |
| Accept the loss of that card | Choose Concede. |
| Select a Battle target | Choose one of the opponent’s three eligible face-down cards. |
| Advance a visual sequence | Use Continue when it appears. |
| Review the action or rules | Open the book icon beside the turn counter. |
| Inspect the opposition | Select the commander’s name to open their dossier. |
 1
2
3
4
5
6
1
2
3
4
5
6
Plate I · The table before first contact
- 1Enemy command. Select the commander's identity when you want to inspect their dossier.
- 2Enemy deck. Its badge reports how many cards remain in the opposing army.
- 3Turn counter and Field Manual. The book is always available when you need the Chronicle, rules, Hall of Valor, or dossiers.
- 4Boneyard. Defeated cards gather here and remain out of play for the rest of the War.
- 5Your command deck. Tap it when prompted to deploy the next card.
- 6Your command. This identifies your side and repeats the number of cards still available.
Your deck count tells you what remains available. Cards at stake are already committed to the table. Watch both: a healthy-looking engagement can leave very little behind it to support the next Battle.
The new clash scenes send two small infantry formations charging into one another when a comparison has a winner. They collide, recoil, and tumble according to the result. Commander portraits also react to meaningful events. A successful rescue is considerably more satisfying when the person across the table has a face.
The cards determine the outcome. The troops act it out. There is no extra timing challenge hidden in the animation.
The Field Manual
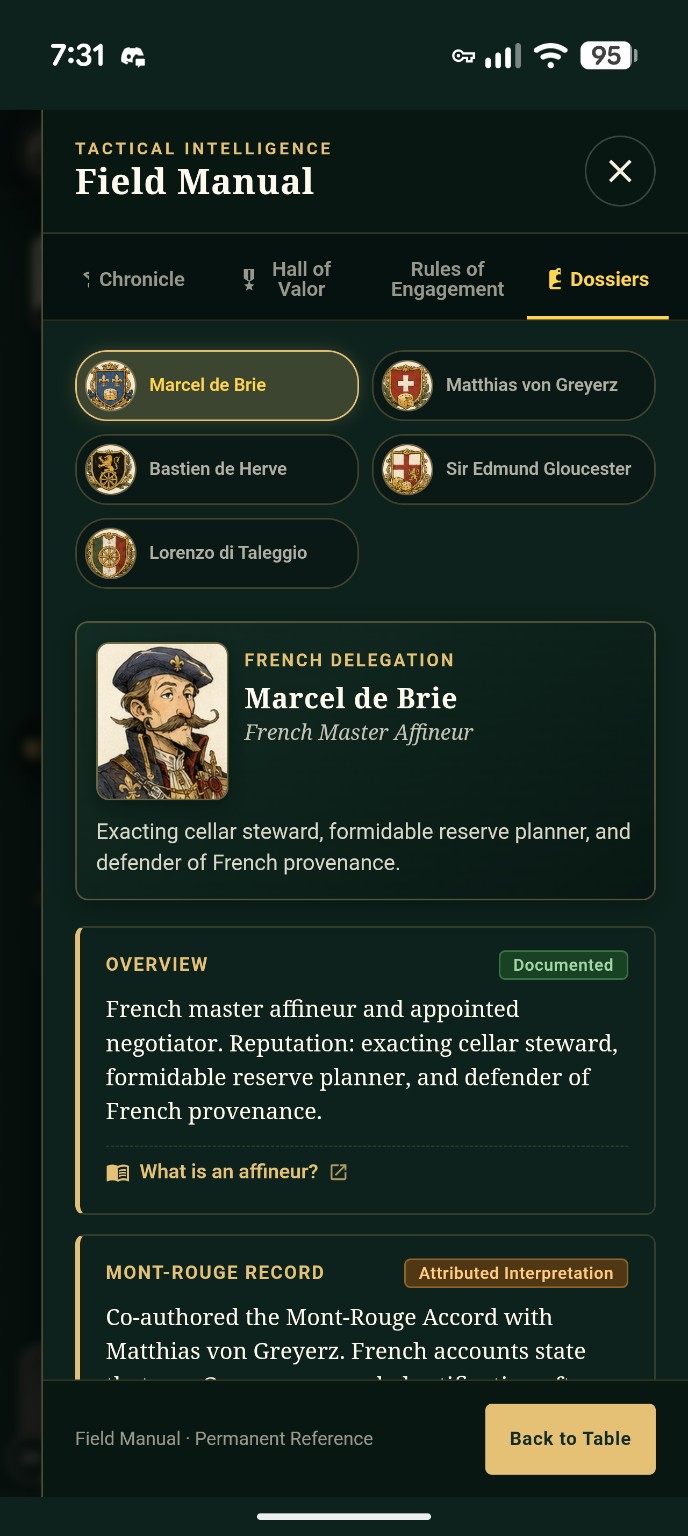
The book on the table is your permanent point of reference. Its four main sections are Chronicle, Hall of Valor, Rules of Engagement, and Dossiers. Inspecting a Boneyard casualty also opens a contextual Card Reference section.
Here is what belongs in each compartment of the command satchel.
 1
2
3
4
1
2
3
4
Plate II · Permanent reference in the field
- 1Manual sections. Move among the Chronicle, Hall of Valor, Rules of Engagement, and Dossiers without leaving the current War.
- 2Commander files. Choose a portrait or crest to review the records discovered for that commander.
- 3Evidence records. Labels distinguish documented facts from attributed interpretations and more questionable testimony.
- 4Back to Table. Close the reference and resume exactly where the engagement paused.
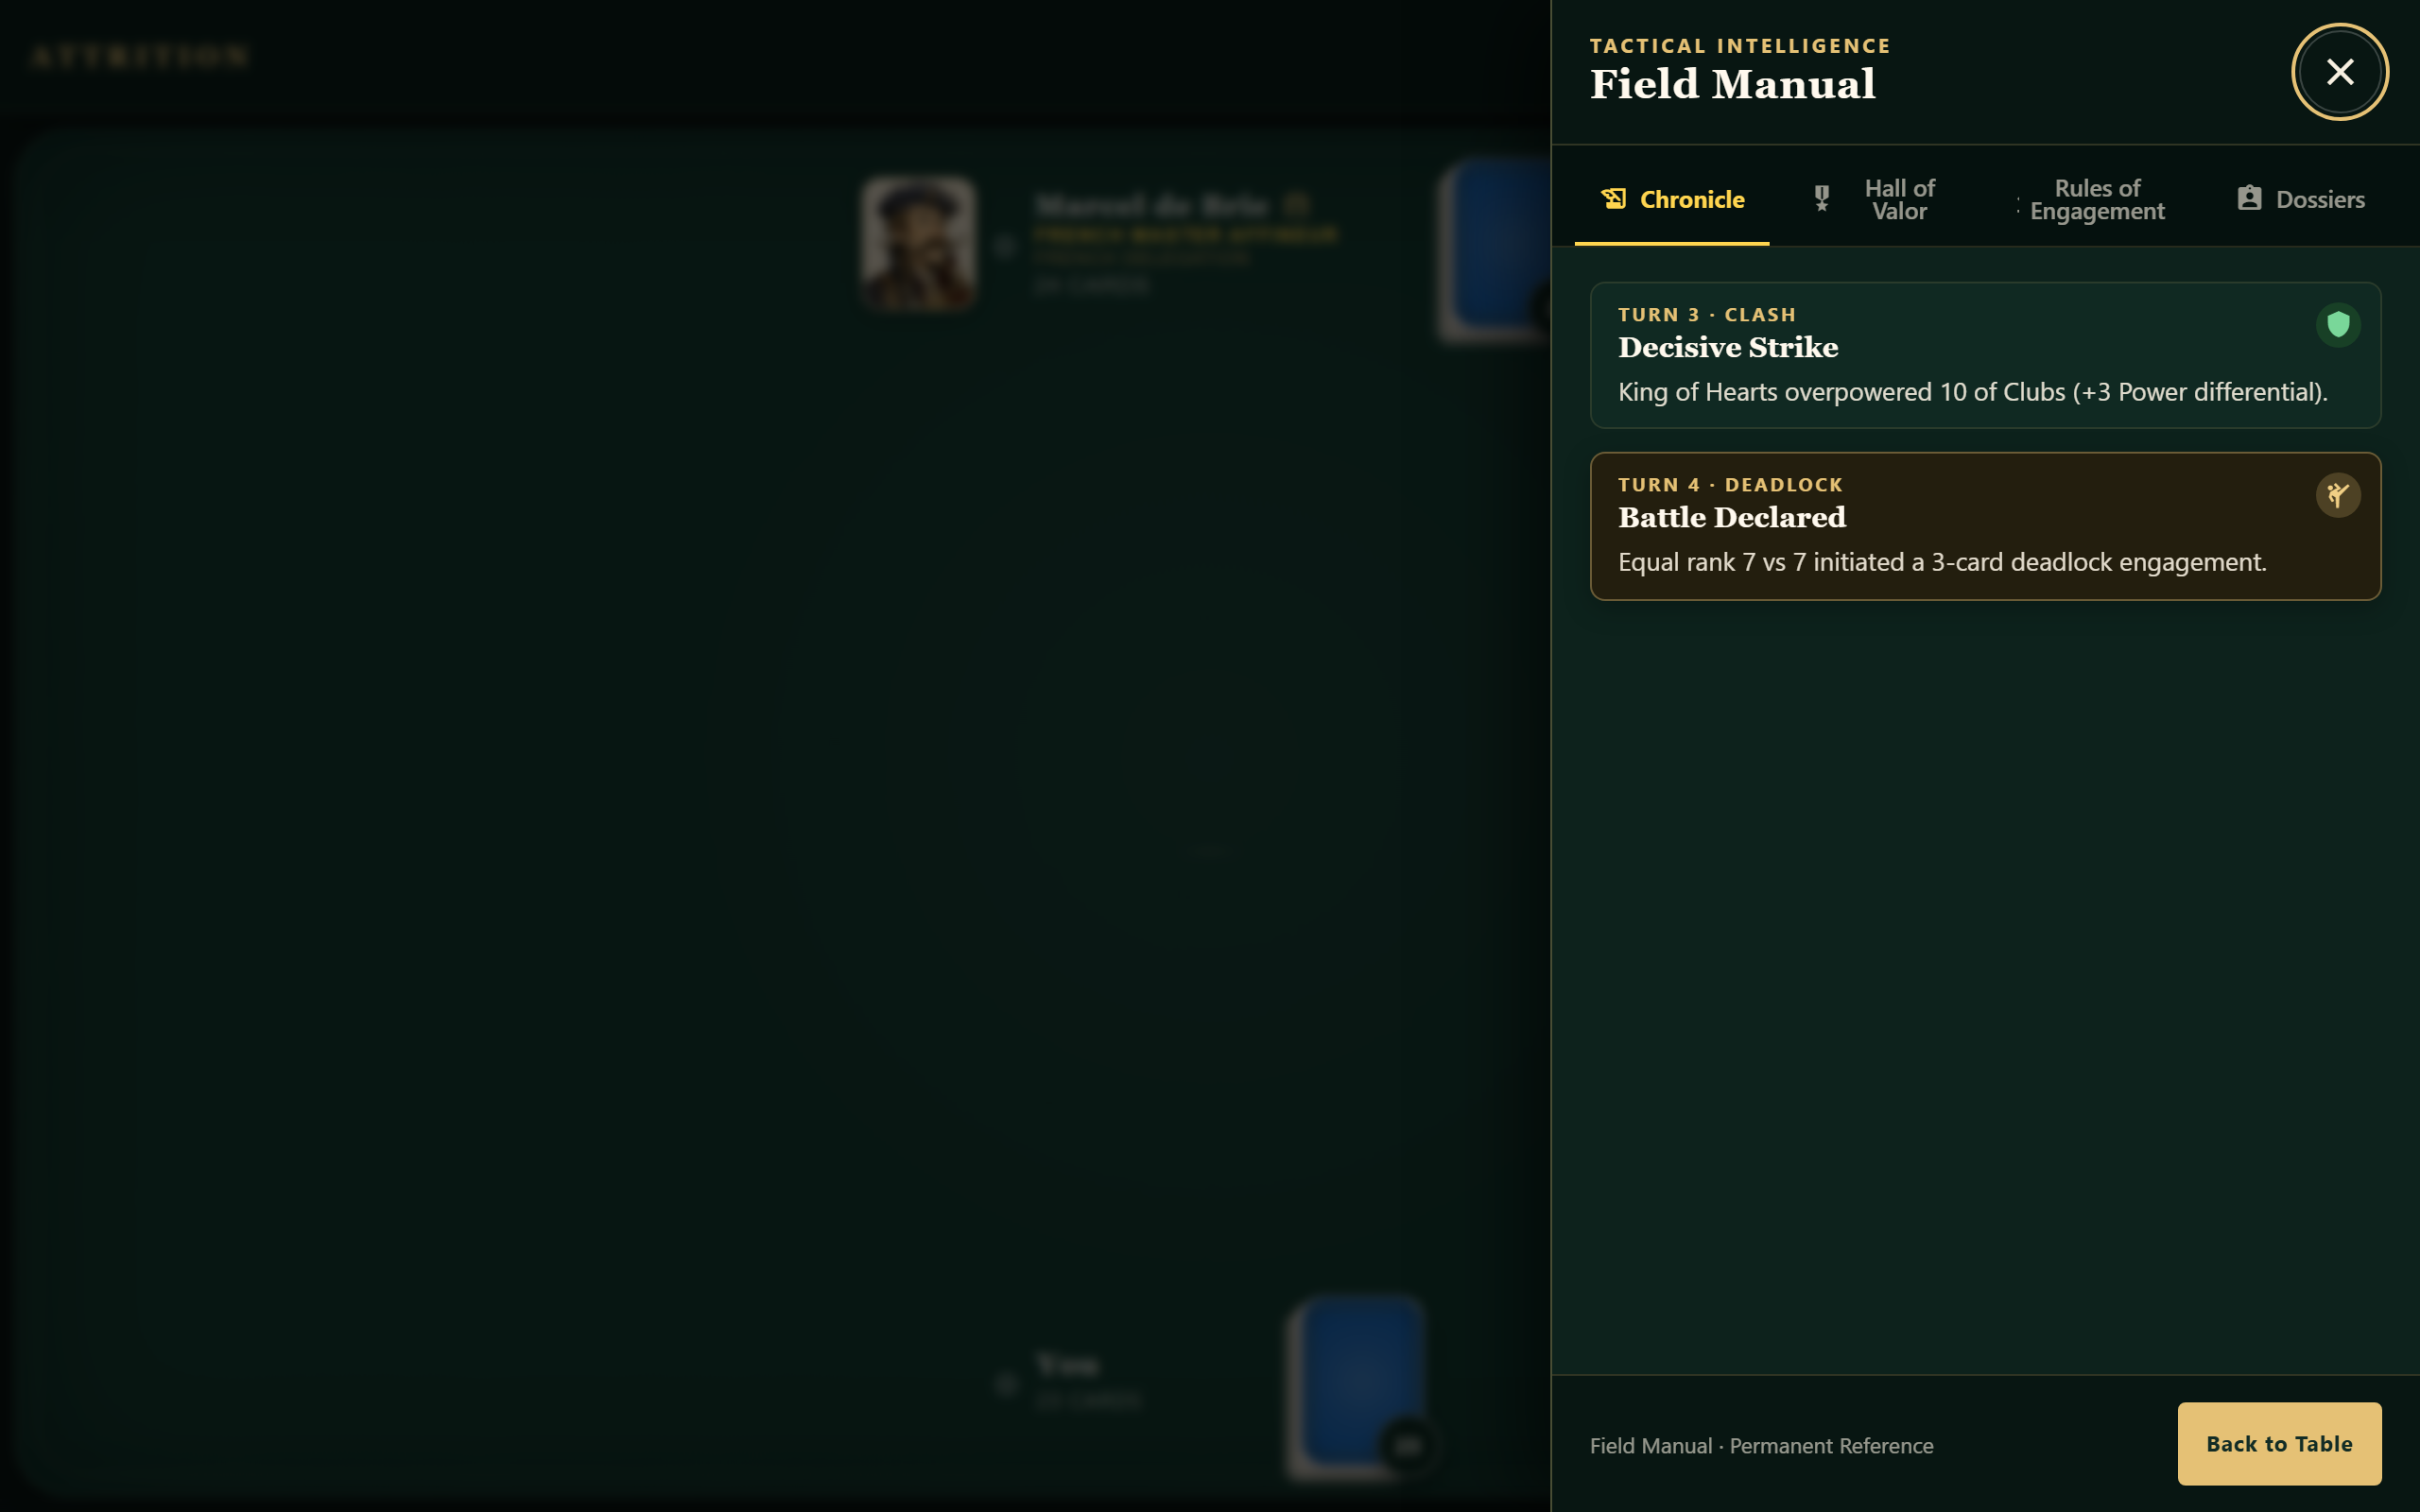
Chronicle — What just happened?
The Chronicle is the running account of the current War: clashes, reinforcements, Battles, casualties, reactions, achievements, and the final result. Routine details live here so the table has room for the moments that need your attention.
Expand Combat Math on an eligible entry to see how the comparison was resolved. A King has base power 13; against a Ten, the displayed difference is 3. That display explains this clash. Your King remains a King when it returns to the deck; it has not become a permanently wounded Three.
The Chronicle also explains equal ranks and the special Two-versus-Ace result. If something felt surprising, this is the first page to check.
Treat it as the current War’s field log. It is held in memory, rather than saved as a permanent archive of every turn you have ever played. Under Fog of War, identifying details of past clashes and casualties are redacted while the War is active.
Hall of Valor — Every card can earn a history
The Hall of Valor gives individual cards service records that persist with your profile. A particular Two can become the one that keeps finding Aces. A reinforcement can repeatedly save its allies. A card can acquire an unfortunate history with the same rival.
Open a decorated card to review its confirmed casualties, Ace assassinations, reinforcement rescues, times rescued, victorious Wars survived, Battle layers survived, and recorded defeats against rivals.
A Juggernaut Citation recognizes three consecutive decisive victories by a card within a War. It is a small medal for a very busy rectangle.
These distinctions commemorate what happened; they grant no combat bonuses. A decorated Seven still compares as a Seven. During active Fog of War, Hall records are sealed and become available again when the War concludes.
Rules of Engagement — Six drills before deployment
Each rule entry opens a short demonstration you can replay or skip. The drills run separately from your actual War, so you can rehearse a Battle without gambling your campaign on understanding the instructions.
1. Objective & Flow. Each side starts with twenty-six cards. An ordinary clash draws one from each deck. The winning card returns to its owner; the defeated card goes to the Boneyard once the outcome is settled. Keep your army alive while the other runs out.
2. Ranks & the 2-vs-Ace Rule. The order is A, K, Q, J, 10, 9, 8, 7, 6, 5, 4, 3, 2, highest first. There is one deliberate exception: a Two defeats an Ace. Suits identify cards but never break a tie. A special Two-over-Ace victory cannot be challenged.
FIELD NOTE: A Two loses to a Three and defeats an Ace. Promotions are apparently complicated.
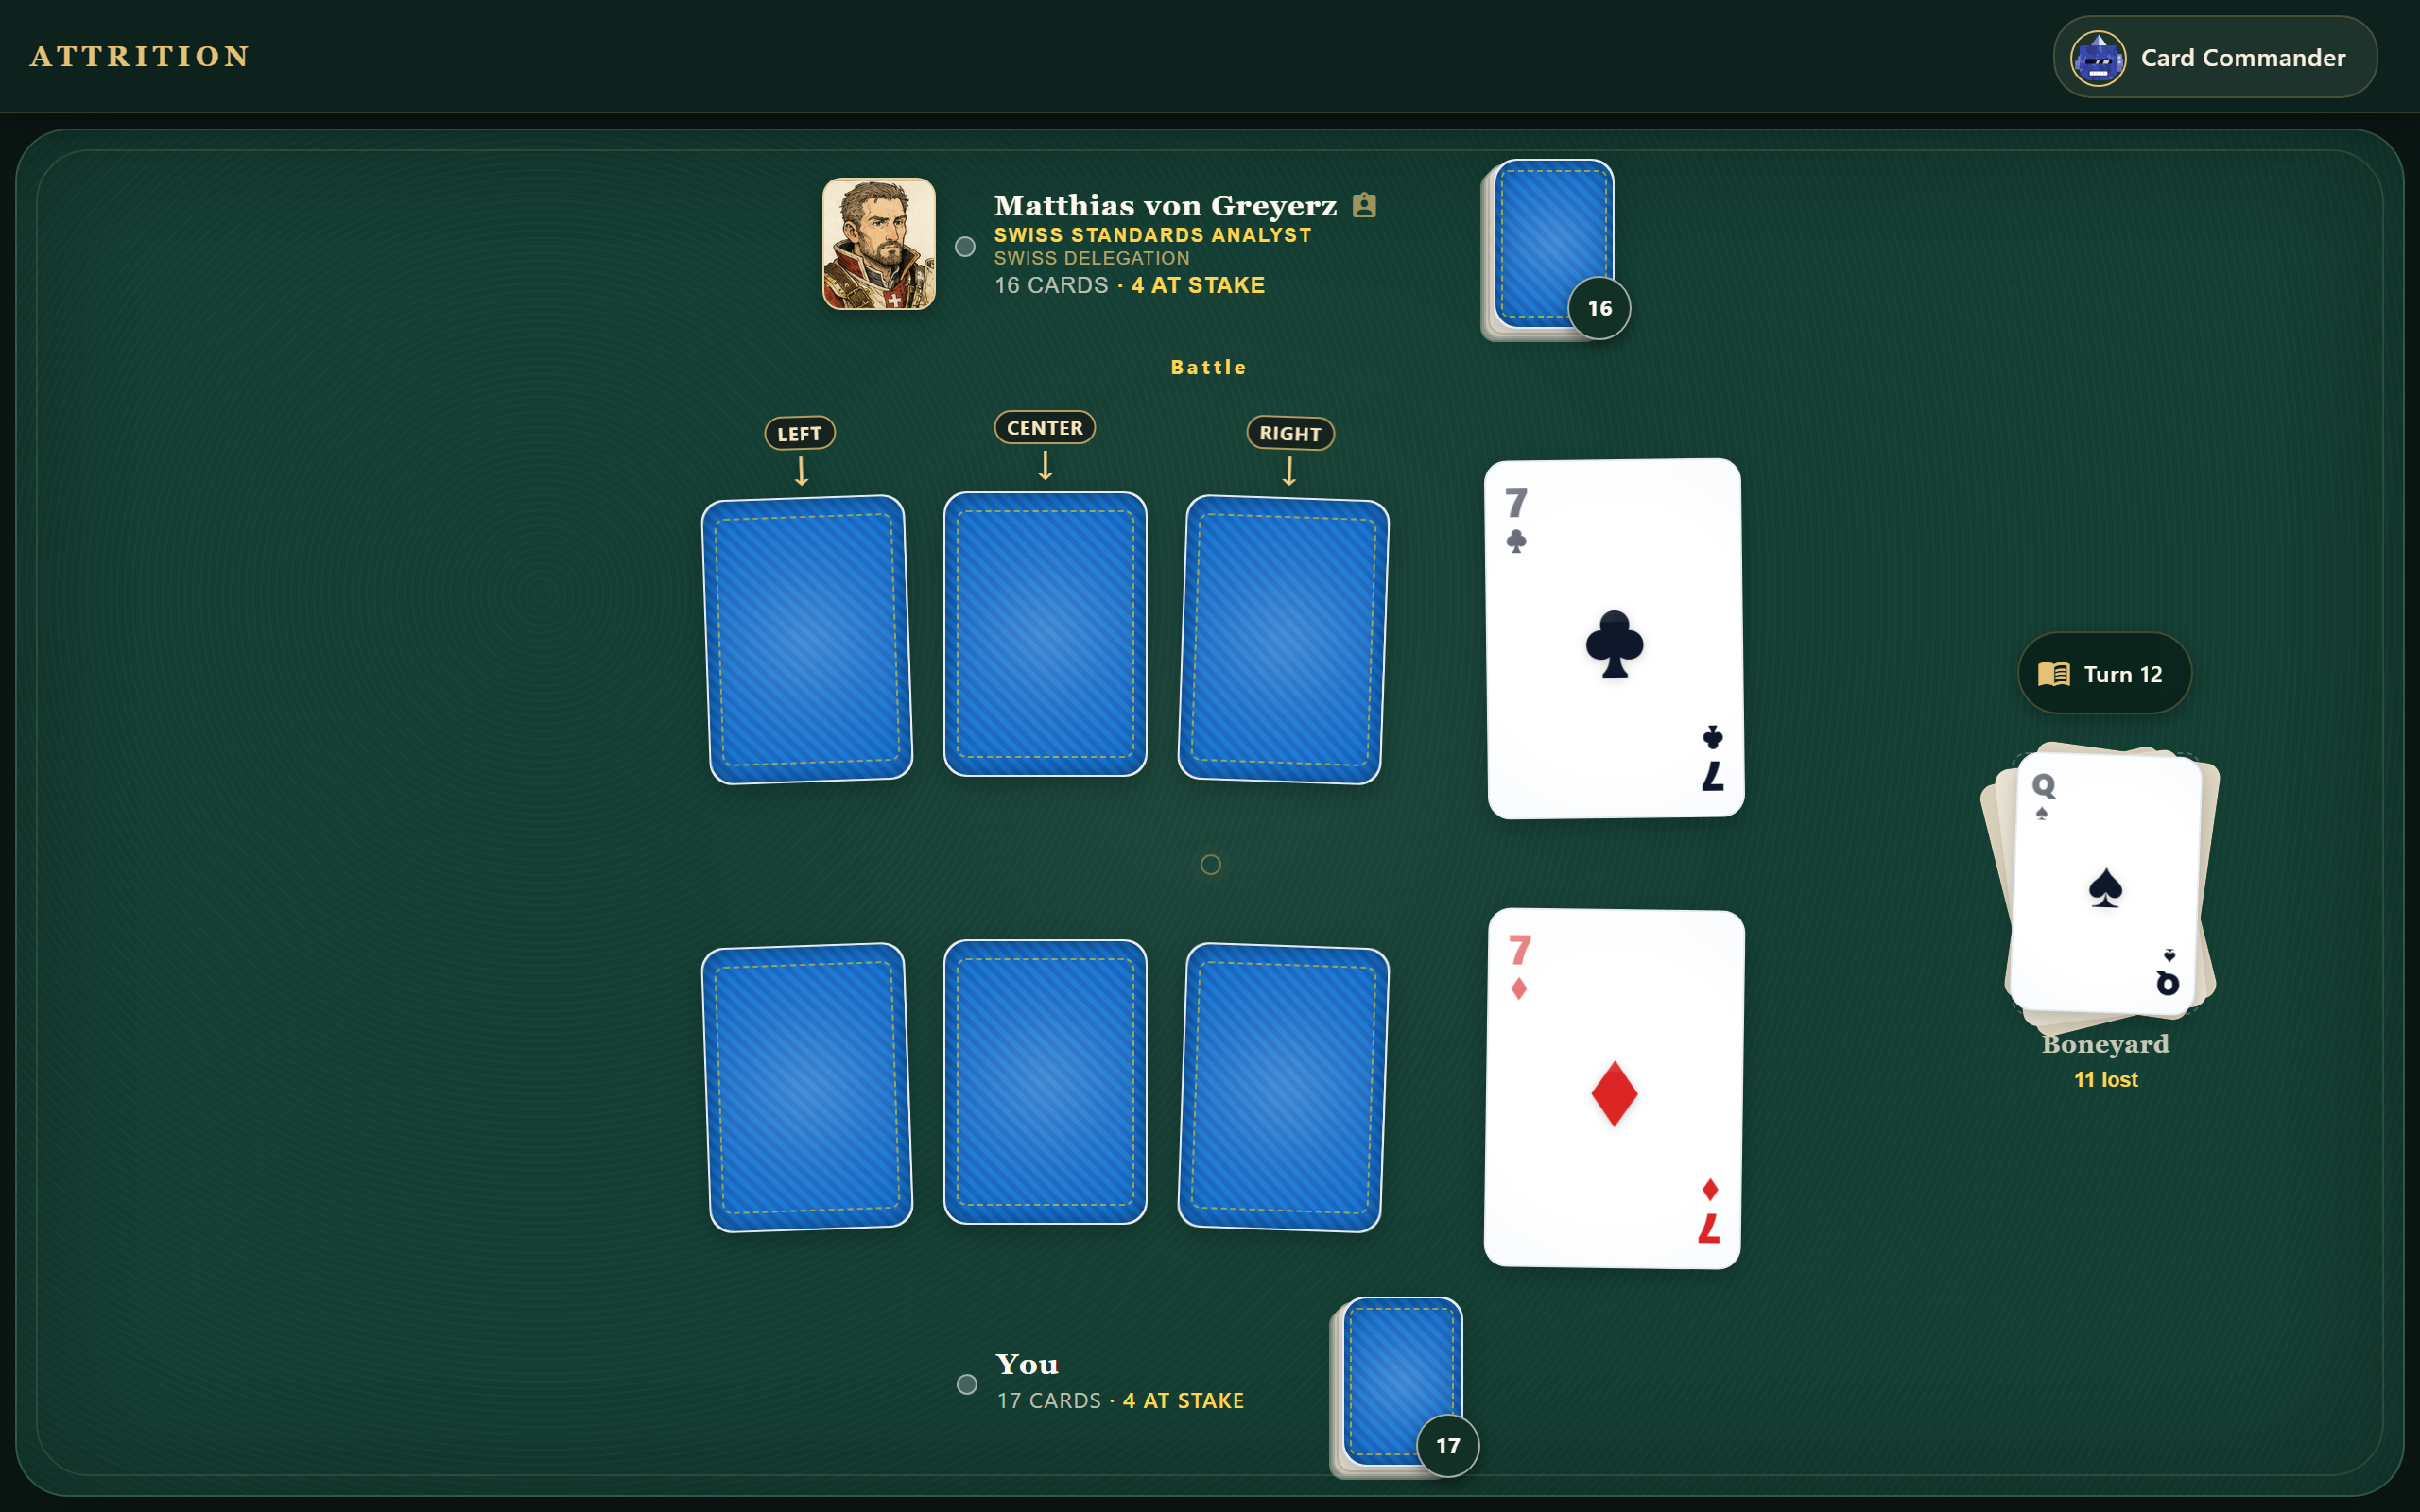
3. Deadlocks & Battles. Equal ranks trigger a Battle. Leave the existing stakes on the table. Each side commits three new cards face-down. You blindly select one of the opponent’s new cards; the opponent blindly selects one of yours. Those two cards reveal and fight for their respective owners.
If they tie, everyone already committed stays at stake, and each side must supply another three cards. Only the newest layer can be selected. When the Battle resolves, the winner recovers all their own committed cards and the loser sends all theirs to the Boneyard. Unselected surviving cards return face-down; hidden casualties are revealed as they are lost.
4. Challenges. After losing an ordinary comparison, you may Challenge the result by committing one reinforcement. The reinforcement’s rank is compared against the opponent’s original winning card. You do not add the two friendly ranks together, and the original defeated card remains at stake.
| Reinforcement result | What happens |
|---|---|
| Win | Both of your cards return to your deck. The opponent’s card is lost. |
| Lose | Both of your cards go to the Boneyard. The opponent keeps theirs. |
| Tie | A Battle begins with all three existing cards still at stake. |
For example, your Six loses to a Queen. You challenge and draw a King: both your Six and King survive, and the Queen is discarded. Draw a Jack instead and you lose both cards. Draw a Queen and you have just ordered a Battle.
5. The Boneyard. This is the casualty record. Its cards are out of play for the rest of the War. When inspection is available, use it to see which threats and potential reinforcements have already been lost. An Ace in the Boneyard cannot ambush your next King. Fog of War seals this inspection until the War ends.
6. War Resolution. Once settlement leaves one army with no cards, the surviving commander wins. Simultaneous depletion is a tie. A Battle can also end the War through attrition: if only one side can supply the required three new cards, that side wins. If neither can, the larger remaining deck wins; equal remaining counts produce a true tie.
FIELD NOTE: Having a strong card on the table does not mean you can afford another three cards underneath it.
Dossiers — The people behind the portraits
Select a commander’s name at the table to open their dossier. As you progress, additional commanders and records become available. Portraits and crests help you keep track of whose version of events you are reading.
The records include Overview, Mont-Rouge Record, Known Associations, Campaign Notes, and Archived Statement entries. They unfold through play instead of handing you the whole story at the beginning.
Evidence badges distinguish documented material, attributed interpretation, and prophetic metaphor. Some records include links to supporting reading. Pay attention to those labels: something a commander believes and something the record establishes are different kinds of information.
This is where the new campaign writing has room to develop. Briefings set the scene, opponents speak during play, and the dossiers let you return to what you have learned. The rest of Mont-Rouge’s business is yours to discover.
Card Reference — Identify the casualty
Select an inspectable card in the Boneyard to open its Card Reference. This extra tab shows the exact card, rank, suit, base value, and guidance about its place in the rules.
If that card has earned distinctions, the reference links directly to its Hall of Valor service record. You can move from “what did I lose?” to “what had that card accomplished?” without hunting through the full roll of honor.
Campaign orders
A War is one game. A Campaign is a three-War series. The story spans four chapters, twelve Wars altogether, with orders that build on what came before.
 1
2
3
1
2
3
Plate III · Orders before engagement
- 1Opposing force. The first four-chapter journey assigns its commander as part of the story. Opponent choice opens for later custom Campaigns; the older photographed control predates that restriction.
- 2Rules of Engagement. Read every active modifier before committing. Later chapters retain the constraints introduced by earlier ones.
- 3Issue Orders & Engage. This confirms the assignment and begins the next War.
| Chapter | Orders | What you must manage |
|---|---|---|
| I — The Accord | Classic rules | Reinforcement opportunities are limited only by the cards in your deck. |
| II — The Closing Passes | Limited Reserves | You have five reinforcement uses across all three Wars. They do not refill between Wars. |
| III — The Blind Wheel | Limited Reserves + Fog of War | Keep that same five-use budget while casualty inspection and identifying historical combat details are sealed during each War. |
| IV — The War of Attrition | Limited Reserves + Fog of War + Total War | All previous constraints remain, and the signed card margins across the three Wars determine the campaign result. |
The five-use restriction applies to your reinforcements. Each use still draws a real card from your deck. When the reserve budget reaches zero, ordinary losses are automatically conceded.
Before Total War, winning more Wars than you lose wins the Campaign; equal wins and losses produce a draw. Total War changes the accounting: your victories contribute positive surviving-card margins, and your defeats contribute negative margins.
For example, +3, +2, −10 = −5. You won two Wars, but the Total War Campaign is a defeat. A zero cumulative margin is a draw. Suddenly, preserving one more card in a losing War matters to the final result.
Complete each three-War chapter to unlock the next. Victory is not required. The first journey follows authored commander encounters and gradually reveals the story. After all four chapters are complete, custom Campaigns let you combine the three optional modifiers however you like, with three distinct opponents drawn from the full commander roster.
Know your opposition
These five commanders have distinct Challenge policies as well as portraits, expressions, crests, and dialogue. Their decisions use legitimate game information; the face-down Battle selection remains blind.





| Commander | Field identification | Expect this |
|---|---|---|
| Marcel de Brie | French Master Affineur · The Quartermaster | Careful reserve planning. He values strong cards and wants favorable odds before spending another. |
| Matthias von Greyerz | Swiss Standards Analyst · The Analyst | Close attention to public casualties and the probabilities they imply. |
| Bastien de Herve | Belgian Tyromancer · The Attritionist | A long view of deck depth and whether the army can sustain another Battle. Also, rind-based intelligence. |
| Sir Edmund Gloucester | English Artisan-Adventurer · The Gambler | Greater comfort with uncertain odds and speculative rescues. |
| Lorenzo di Taleggio | Italian Merchant-Prince · The Cornered General | Discipline while reserves are healthy, followed by increasingly defiant reinforcement decisions near exhaustion. |
Their dialogue responds to rescues, setbacks, narrow victories, and the progress of the campaign. Those moments are part of the recent work: the opposition now has more to say about the War you are actually fighting.
Between engagements
Your profile brings together career statistics, achievements, and campaign history. The game now has thirty-four visible achievements divided into Milestones, Distinctions, and Prestige, alongside the individual card histories in the Hall of Valor. Five additional Anomalies remain hidden unless they are actually observed. Recent fixes also tightened statistics and settlement accounting, including awkward endings where a Battle exhausts an army.
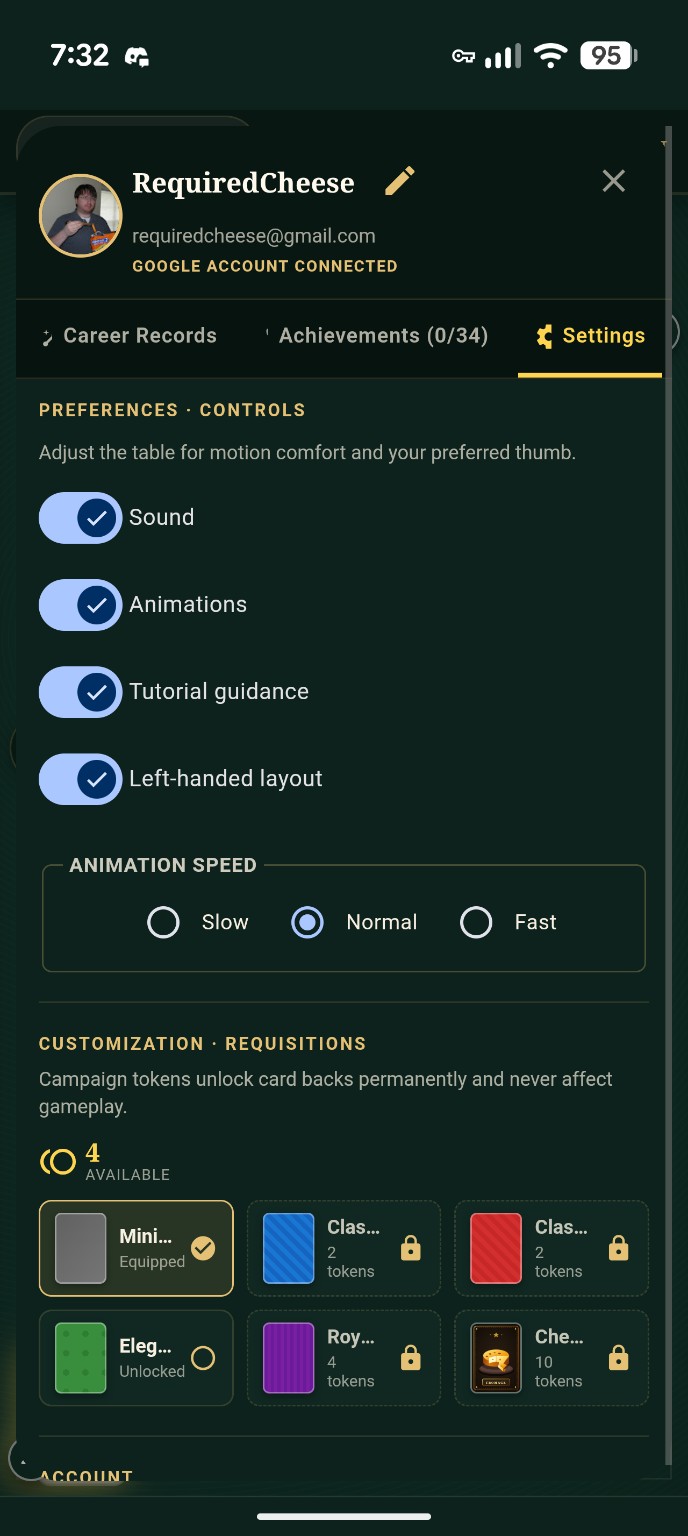
Victorious Campaigns award tokens: one for the victory, with another for a positive cumulative card differential. Cosmetic unlocks and card backings give you something to spend that success on. A different backing changes the appearance of your cards without changing their strength.
Settings begins with Account and Data & Privacy, followed by ordinary preferences and cosmetic requisitions. Choose a left-handed layout, Slow/Normal/Fast animation speed, sound effects, and whether animations play automatically. The presentation also respects reduced-motion preferences. Tutorial guidance can be switched on, and Replay tutorial starts the table orientation again whenever you want another walk through the basics.
The Data & Privacy section repeats your analytics choice and links directly to the privacy, support, and deletion pages. Optional analytics are never a condition of play: collection remains off unless the release is configured for it and you explicitly opt in, and turning it off prevents new events. The destructive career-reset shortcut shown in one older plate has been retired from ordinary Settings; the dedicated deletion page remains available when you actually want to remove application-owned local data.
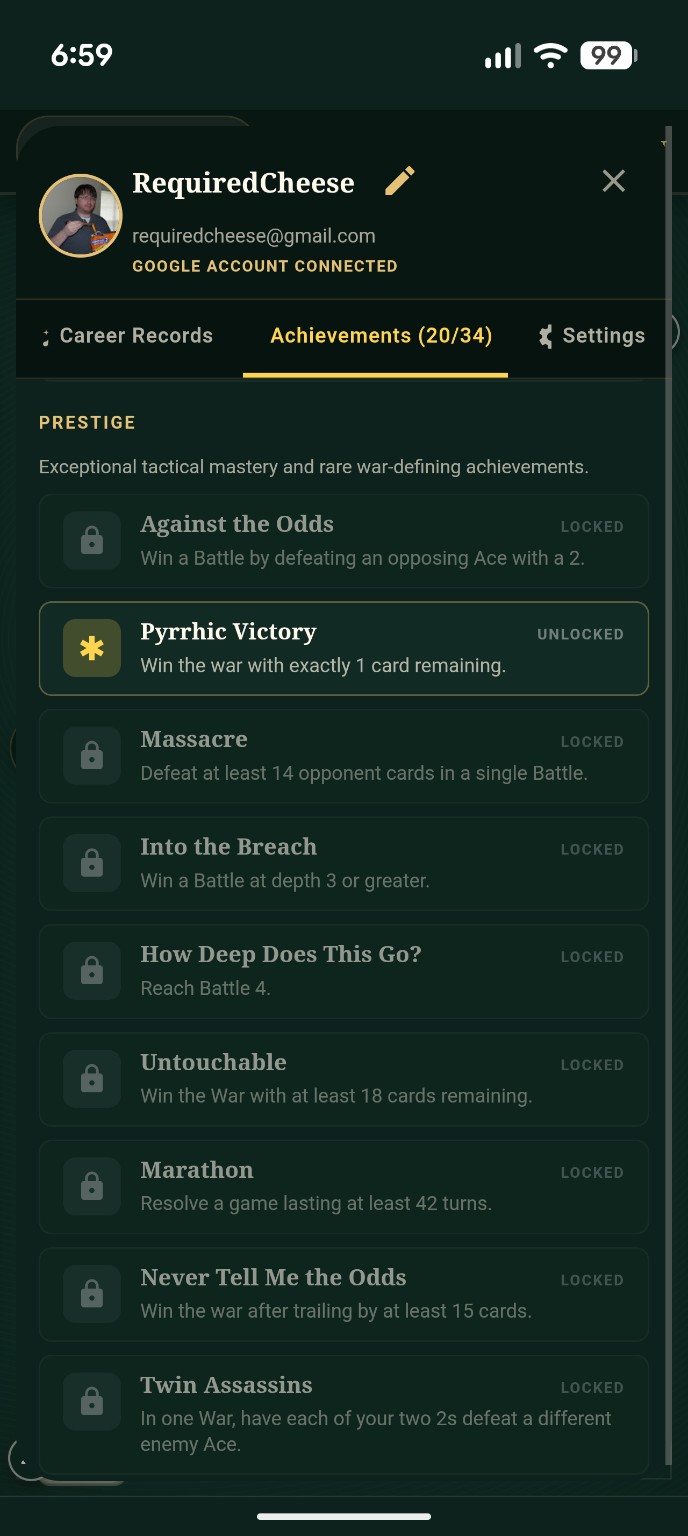
The table has layouts for phones, tablets, and desktop screens. You can play in the browser, and supported browsers can install it as a web app. Android packaging and release preparation have also been part of the work; the browser link above remains the direct way to jump in from this booklet.
Attrition is ad-free. Optional usage analytics start disabled and require consent.
Notes from the quartermaster
- A rescue is a wager. Consider the card you might save, the extra card you might lose, and the possibility of a tie leading to Battle.
- Count beyond this turn. A reinforcement can leave you unable to supply the next three-card Battle layer.
- Use the casualty record. When the Boneyard is open, it tells you which cards have left the War for good.
- Read the orders every chapter. Five reserves means five for the entire Campaign, and later chapters retain earlier constraints.
- Let the Chronicle explain a surprise. The comparison breakdown and rule drills are there for exactly that moment.
That is the booklet I wanted Attrition to have: enough instruction to get you playing, enough character to make you curious, and a few notes you might return to after an especially expensive decision.
My thanks to the friends who helped invent the game and everyone who has kept playing, testing, and finding the things I missed.
Now put the booklet beside you. Shuffle the deck. Try to bring somebody home.
Take command — play Attrition · Follow the project
— Chris